If you are owning a website, it is important to have a good speed of that. This is because only a fast loading website is preferred by the visitors and also by search engines. And there are many tools through which you can improve the speed of your website. Google Tag Manager (GTM) is a free tag management solution that resolves this issue. You can use Google Tag Manager to improve performance. It’s used to control all your Analytics and marketing tags from a single place without having to interact with your website code. It’s like a digital basket, keeping all of your analytics and marketing tags side by side while keeping your site code untouched. But you might wonder, how to use Google Tag Manager?
You must be thinking it as a complicated method but it is the most hassle-free one to improve the website performance. The GTM is becoming popular among all the website owners these days. As using this you need not to add each individual script or analytics tracking code to pages or page headers.
It can all be done through tag manager using a web interface. This can make it easier for developers because they don’t need to add some code to the site every time a new tool is used.
Step by step guide to using Google Tag Manager
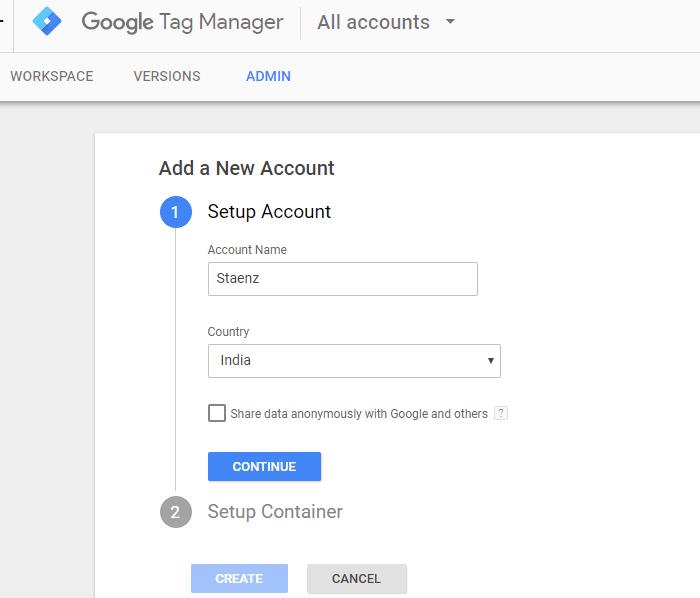
1. Account setup
First thing first, you need to set up the account for Google Tag Manager. So for that login to the website of GTM and you will see the page like the below image. There you have to set up the account with account name and country.
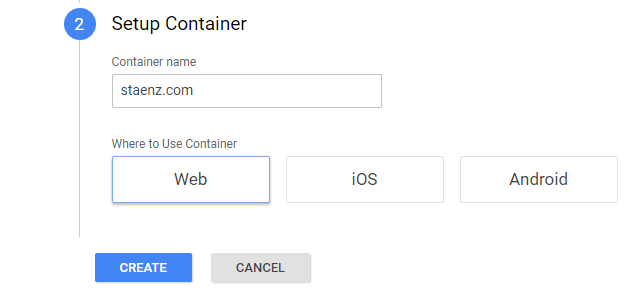
2. Setup container
The next step is to set up the container, in which you have to provide the name of the website. Once you provide the website then select as to where you are going to use the container. The container can be used for web, iOS, Android etc. So once you fill-in everything, hit the “create” button.
3. Install Google Tag Manager
Once you set up the account, the tag manager will ask you to set up the account. With that, you can copy the given code and paste it onto every page of your website. After that hit the “OK” button for the next step.

4. Select “New Tag” option
Now a screen will appear in front of you as given in the below screenshot. There you will find a lot of options like new tag, now editing, container not published, description etc. So now you have to create a new tag. So select the option of “New Tag”.

5. Name the Tag
Now that you have opened the “Add New Tag” window. You will find a blank space where you have to put the name of your tag. Here in this screenshot, we have put the name as “Google Analytics”. Once you put the name, then click on the “Tag Configuration”.

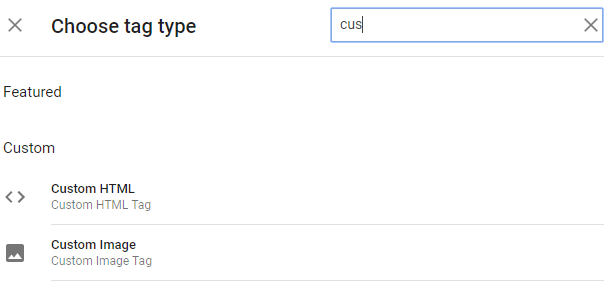
6. Choose Tag Type
After naming the tag, you get to click on the configuration and then you find around 50 tag types that are already in integration with the Google Tag Manager. There are options for Universal Analytics, Classic Google Analytics, AdWords Remarketing up to 50 more. There are also custom tags available that can create using custom HTML.

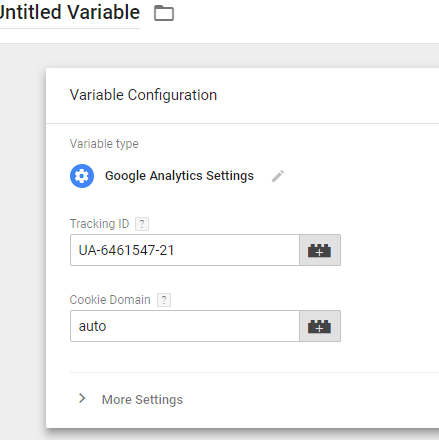
7. Variable configuration
Once the tag type is selected, you have to complete the formalities for its configuration as well. Now that we are making a tag for Google Analytics, we will be putting the Analytics tracking ID that can be found on the HTML page of the website. Suppose, you are creating a tag for Classic Google Analytics, then it will ask to put the website property ID.
8. Choose the Trigger
Once you complete the tag configuration part, you will be asked to choose the trigger. So you will be choosing the trigger for all pages and the type will be page view. Once you add everything, don’t forget to hit the “Save” button. And your Tag is ready.

9. Custom Tag
There are already 50 tags available in Tag Manager, but what if you want something else apart from this. So we wanted to create a tag for Facebook Chat, the tag is not available there. So in his case, we chose the custom tag option. You can see the screenshot below.
Once you select the custom HTML tag, you will see a screen like the below one. So put the code in that area, select the triggering and hit the save button to create the tag.

If you have overburdened your website with tags and expect it to load in a matter of seconds, GTM could be your ultimate tool to improve your website speed and deliver a good first impression.
So now that you are aware of how to use the Google Tag Manager, it will be easy for you create the tags for different pages just at one place. The guide will take you through all the intricate details of how to use the Tag Manager.
It is very simple to use and you don’t have to be a developer to add tags to the website because Google Tag Manager does everything for you. Just put the right details and you are good to go.
Use Google tag Manager to improve the performance of the website. Get started with it today!